Screens Connect is the easiest way to make a computer available for connections from outside its local network, but under certain circumstances, Screens Connect isn't a viable option. In such cases, it's still possible to connect to a computer from across the Internet.
First, prepare your computer for remote access
For Screens to connect to your computer, it has to be configured to receive incoming connections via the VNC and/or SSH services. See these instructions to learn how to prepare your computer for remote access:
Once your computer is ready, you can proceed with the following instructions:
Step 1: Update your public IP address automatically
Your public IP address will change from time to time. To make sure that Screens can find your computer when connecting remotely, you will need to subscribe to a service that will monitor IP address changes.
For this example, we chose a free service called No-IP, which is not associated in any way with Edovia. There are many similar services available on the web and they all have a similar setup procedure.
Create a No-IP account and host
Go to https://www.noip.com/remote-access/.
Select Free Dynamic DNS.
Sign Up for the service.
Once your No-IP account has been created and validated, go to https://www.noip.com/#loginModal to log in.
Select Dynamic DNS > Create Hostname.
Type a Hostname:
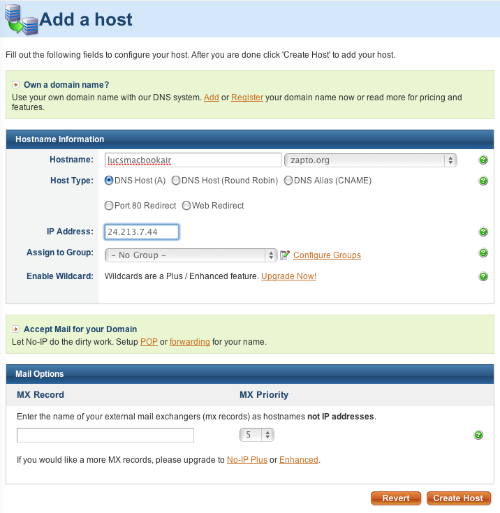
Make sure DNS Host (A) is selected.
Do not change the IP address. It is your current public IP address.
Click on Create Hostname.
Install the Host Updater
Many routers will let you do this easily, without having to install any additional software on your Mac. Consult this page to see if your router supports the No-IP service.
If your router doesn't support the service, follow these instructions:
- Go to https://www.noip.com/download.
- Select the download for your OS (Mac, Windows or Linux).
- Download the latest version of the app.
- Scroll down the Download page in order to get the installation instructions.
Step 2: Make your computer's local IP address static
You'll find instructions for:
On your Mac
Like your public IP address, your local IP address may change from time to time. We need to make sure it stays the same.
Click this link top open network settings on your Mac.
Browse to Network
Select the current network and click Details…
Select TCP/IP
Under Configure IPv4, select Using DHCP with manual address.
Select a static IP that will not conflict with anything else on the network. It’s best to pick a number far out of the normal range of assigned IP’s, in the example below we chose 10.0.1.245 because most of the machines on this network stop at 10.0.1.150. Check your router's IP address to know which range to use.
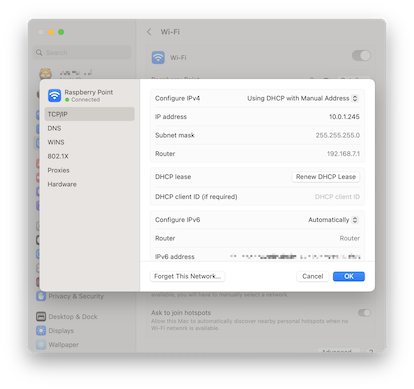
Click OK or Apply
Your IP will now be set to the static address you provided. Note that you will briefly disconnect from the network while this occurs.
Note: Instructions for macOS 12 or earlier are available here.
You can now move to Step 3.
On your Windows PC
Like your public IP address, your local IP address may change from time to time. We need to make sure it stays the same.
Get information about your network
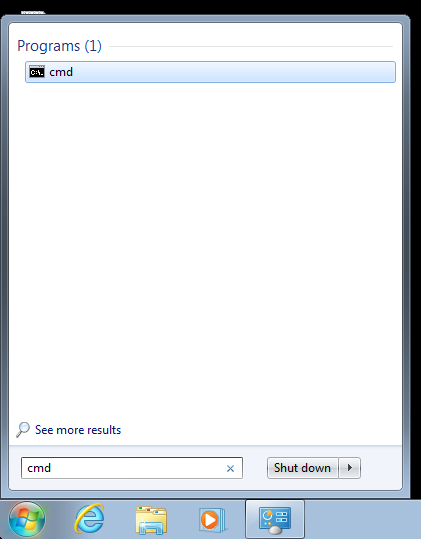
Click Start and type cmd. Press enter.
A shell window will appear. Type ipconfig and press enter.
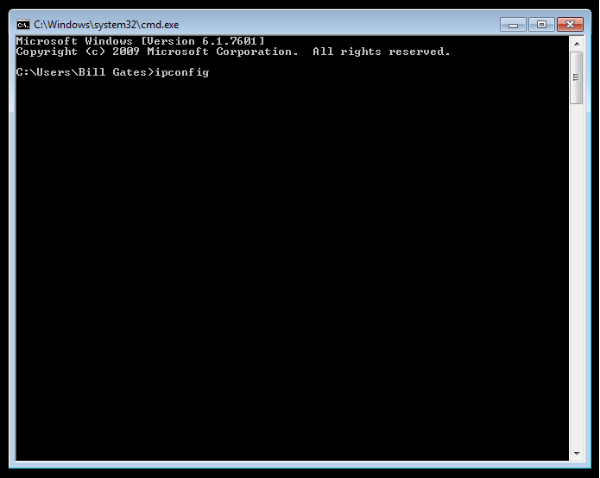
You'll see information regarding your network.
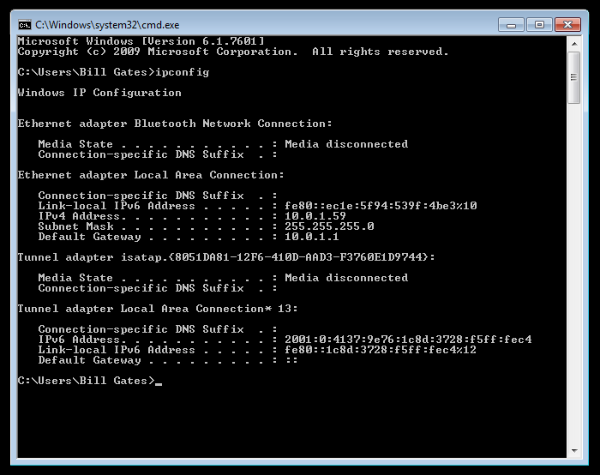
Under Ethernet adapter Local Area Connection, write down the addresses for:
- Subnet Mask
- Default Gateway
Making your PC's IP address static
Type network and sharing into the Search box in the Start Menu and select Network and Sharing Center when it comes up.
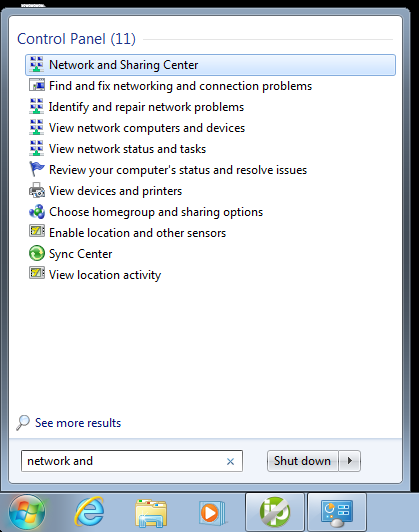
Then when the Network and Sharing Center opens, click on “Change adapter settings”.
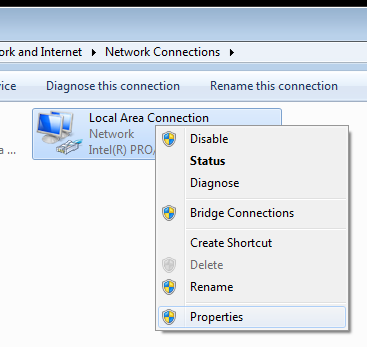
Right-click on your local adapter and select Properties.
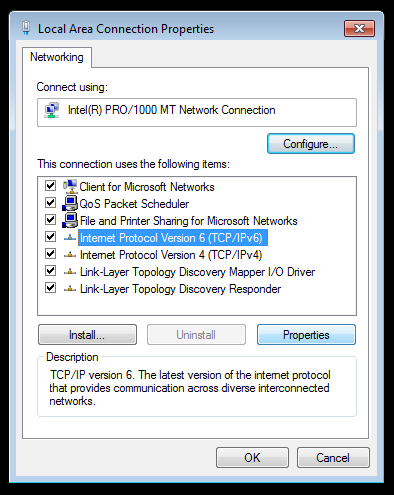
In the Local Area Connection Properties window highlight Internet Protocol Version 4 (TCP/IPv4) then click the Properties button.
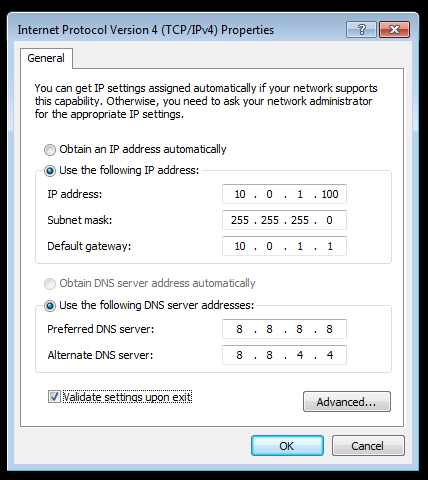
Now select the radio button “Use the following IP address” and enter in the correct IP, Subnet mask, and Default gateway that corresponds with your network setup. Then enter your Preferred and Alternate DNS server addresses. Here we’re on a home network and using a simple Class C network configuration and Google DNS.
Check ”Validate settings upon exit” so Windows can find any problems with the addresses you entered. When you’re finished click OK.
You can now move to Step 3.
On your Linux PC or Raspberry Pi
Like your public IP address, your local IP address may change from time to time. We need to make sure it stays the same.
Get information about your network
Open Terminal and type sudo ifconfig
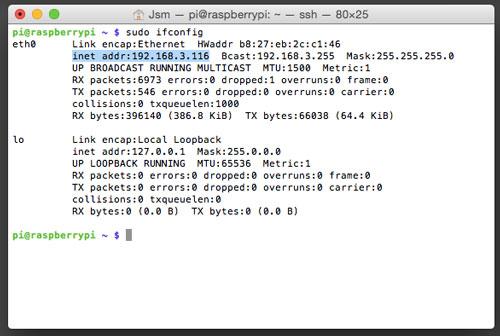
Make a note of the following data:
- Current IP Address (inet addr)
- Broadcast Range (Bcast)
- Subnet Mask (Mask)
So, from our example, I would get the following information.
- Current IP Address = 192.168.3.116
- Broadcast Range = 192.168.3.255
- Subnet Mask = 255.255.255.0
Different networks will give you different data, so make sure you don't just copy our results!
With those noted down, run sudo route -n, this will give us information from your router.
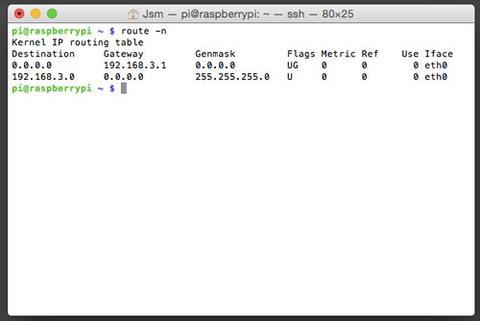
Make sure you note down the following information given from this command:
- Gateway
- Destination
So from the example, I would get the following:
- Gateway = 192.168.3.1
- Destination = 192.168.3.0
OK, so we’ve now obtained all of the data that we need to setup our Raspberry Pi with a shiny new static IP address, it’s time to save it to a config file.
Time to run sudo nano /etc/network/interfaces. This opens the configuration file for the network settings in the nano text editor. If you’re more confident with an alternative text editor that’s fine too!
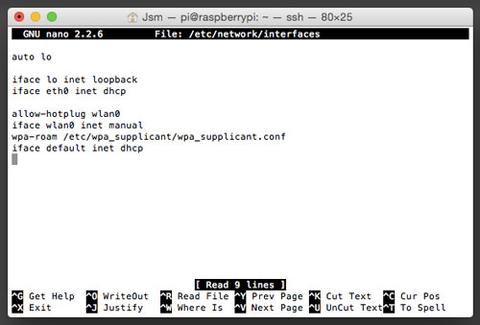
the line that reads “iface eth0 inet dhcp” is telling the ethernet “eth0” networking interface to use “dhcp” (dynamic IP). Firstly, replace “dhcp” with “static”.
Next up, add the following lines directly below the line you just altered, filling the []’s with the date you obtained above.
- address [your chosen IP address]
- netmask [your netmask]
- network [your destination]
- broadcast [your broadcast range]
- gateway [your gateway]
Don't forget to save your file!
Here’s an example of the content of the file:
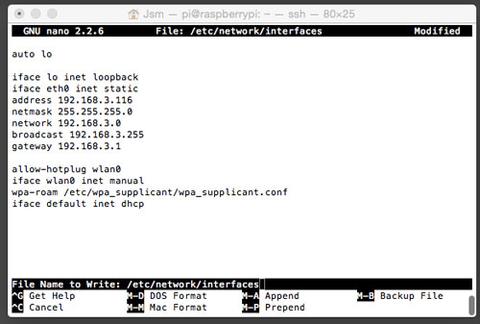
Run sudo reboot to restart your Raspberry Pi with its new static IP address. The changes we have made will only take effect after a reboot.
You can now move to Step 3.
Step 3: Port-Forwarding
As your network requires a public IP address, you will also need to create public ports that will redirect to your new static IP address and the private port used by Screen Sharing (normally 5900 unless you have changed it).
For the sake of this example, we'll use an Airport Extreme. If you have a different router, we suggest that your consult the excellent Port Forward website. Select your router brand and model, and then select VNC on the next page.
Open Airport Utility.
Select your router if it's not already selected.
Click Manual Setup and enter your administrative password.
Click the Advanced tab, then the Port Mapping tab.
Click the button to add a new port mapping.
Select Apple Remote Desktop in the Service list.
In the Private IP Address field, enter the static IP address you've created in Step 2.
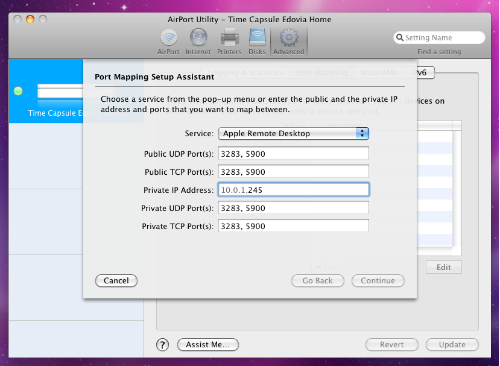
Click Continue, then Done.
Click Update to apply the changes on your router.
Step 4: Setting up Screens
Open Screens and create or edit a screen like you would normally do.
In the Address field, type your No-IP host. In our case, it's lucsmacbookair.zapto.org.
Set the Port field to 5900 or the port number you used in Step 3.
Select the correct Operating System, Authentication method and credentials.
Save.
Select the screen to initiate a connection.
You'll find more details about how to configure Screens for custom URLs and ports in this article.
