
Screens Connect normally configures your router automatically. If your router doesn't support automatic port mapping, has UPnP/NAT-PMP disabled, or automatic configuration isn't working, you can configure your router manually instead.
Manual configuration requires you to:
- Make sure your Mac keeps the same local IP address.
- Configure your router to forward an incoming port to your Mac.
- Tell Screens Connect which public port you configured.
Looking for an easier alternative?
Screens also natively supports Tailscale, which doesn't require port forwarding or manual router configuration.
If your Internet connection uses Carrier-Grade NAT (CGNAT), manual port forwarding may not be possible. In that case, Tailscale is generally the better option.
Before proceeding, make sure Screen Sharing or Remote Management is properly configured on your Mac:
Prepare Your Mac for Screen Sharing
Using Port Forwarding
Step 1: Give Your Mac a Stable Local IP Address
Your router needs to know which computer should receive incoming Screens connections.
Normally, your router automatically assigns your Mac a local IP address such as:
192.168.1.25or:
10.0.0.25That address may change over time. If it changes, a port forwarding rule pointing to the old address will stop working.
For this reason, your Mac needs a stable local IP address.
Recommended: Reserve the Address on Your Router
If your router supports DHCP reservations, reserved IP addresses, or static leases, we recommend using that feature.
A DHCP reservation tells your router to always assign the same local IP address to your Mac. This is generally easier and avoids accidentally choosing an address already being used by another device.
The exact procedure varies by router. Check your router manufacturer's or Internet provider's documentation for terms such as:
- DHCP Reservation
- Reserved IP
- Address Reservation
- Static Lease
Some routers, including Xfinity gateways, manage the destination device directly when creating a port forwarding rule and may not require you to manually assign an address on the Mac.
If your router handles this automatically, you can continue to Step 2.
Alternatively: Configure the Address on Your Mac
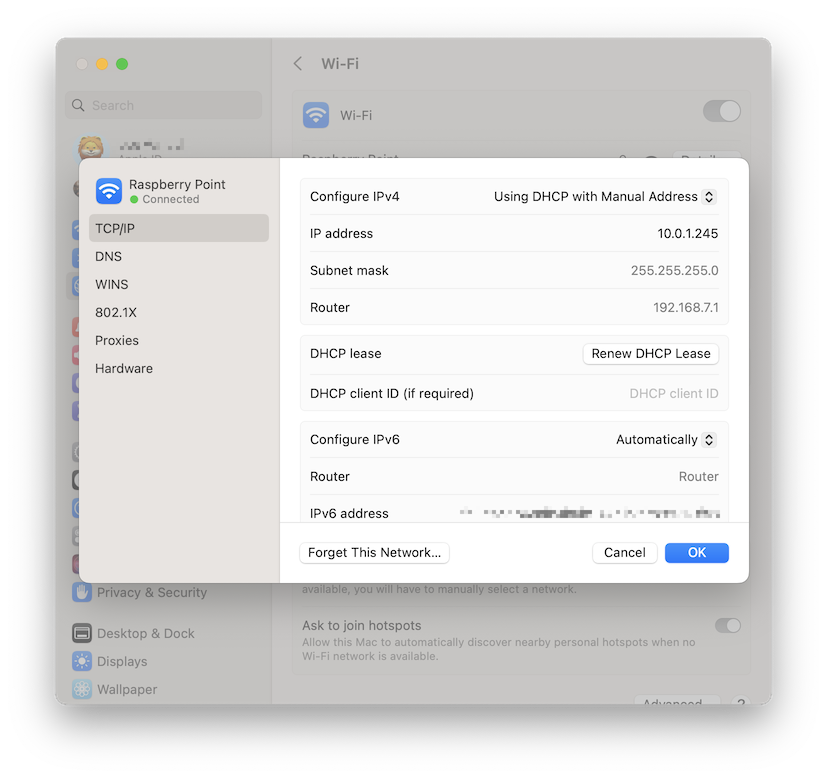
If your router doesn't provide a way to reserve an address, you can configure one directly on the Mac.
Click the following link to open Network settings:
Then:
- Select the network connection your Mac is currently using.
- Click Details…
- Select TCP/IP.
- Under Configure IPv4, select Using DHCP with manual address.
- Enter an unused local IP address that belongs to your network.
- Click OK or Apply.
How Do I Know Which IP Address to Use?
The address must belong to the same local network as your router and must not already be used by another device.
For example, if your Mac currently has:
192.168.1.25an appropriate address might look like:
192.168.1.200However, don't simply copy this example. Networks use different address ranges, and choosing an address already assigned to another device can cause network problems.
If you're unsure which address to use, we recommend using your router's DHCP reservation feature instead or consulting the documentation for your router or Internet provider.
Note: When changing your Mac's local IP address, the Mac may briefly disconnect from the network.
Instructions for macOS 12 or earlier are available here.
Step 2: Configure Port Forwarding on Your Router
Next, configure your router to send incoming Screens connections to the Mac.
Router interfaces vary considerably, so we recommend using the official instructions from your router manufacturer or Internet provider whenever possible.
Your port forwarding rule needs three important pieces of information:
Destination
Select the Mac you're configuring, or enter the stable local IP address from Step 1.
Internal Port
Screens uses:
- 5900 for standard VNC connections.
- 22 when using Screens' Secure Connection (SSH) option.
Public or External Port
Choose the port that will be accessible from the Internet.
It doesn't need to be the same as the internal port.
For example, you could configure:
Public port: 59107
Mac: 192.168.1.200
Internal port: 5900
Protocol: TCP
This tells your router:
When a TCP connection arrives on port 59107, send it to port 5900 on this Mac.
Remember the public/external port number you choose. You'll enter it into Screens Connect in Step 3.
Instructions for Popular Routers and Internet Providers
Here are official port forwarding instructions for several common router platforms:
If your router isn't listed, check its manufacturer's support website for Port Forwarding, NAT Forwarding, or Virtual Server instructions.
You can also use PortForward.com as a reference for many older or less common router models.
Xfinity users: Xfinity currently manages port forwarding through the Xfinity app. Follow Xfinity's instructions and select the Mac as the destination device. Choose Manual Setup when asked which application or service you're configuring.
Step 3: Configure Screens Connect
Once the router is configured, open Screens Connect from its icon in the Mac menu bar.
If You Forwarded to Port 5900
Leave Use Remote Login disabled.
Open the Advanced tab and enable Custom Configuration.
Enter the public port number you configured on your router.
For example, if your rule is:
Public port 59107 → Mac port 5900enter:
59107Leave the Public IP Address field empty.
If You Forwarded to Port 22
Enable Use Remote Login under the General tab.
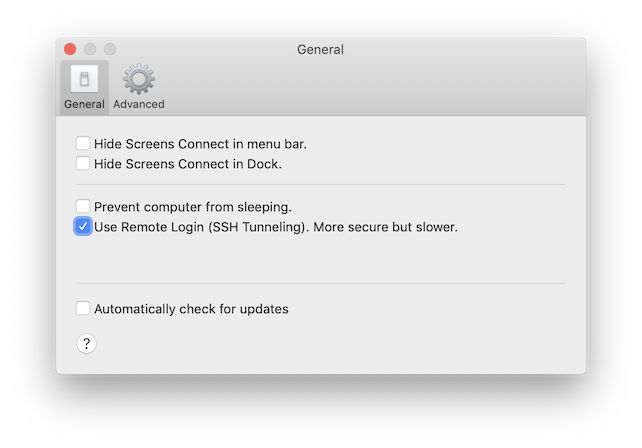
Make sure Remote Login is also enabled under:
System Settings > General > Sharing > Remote Login
Then open the Advanced tab, enable Custom Configuration, and enter the public port number you configured on your router.
For example:
Public port 2299 → Mac port 22Enter:
2299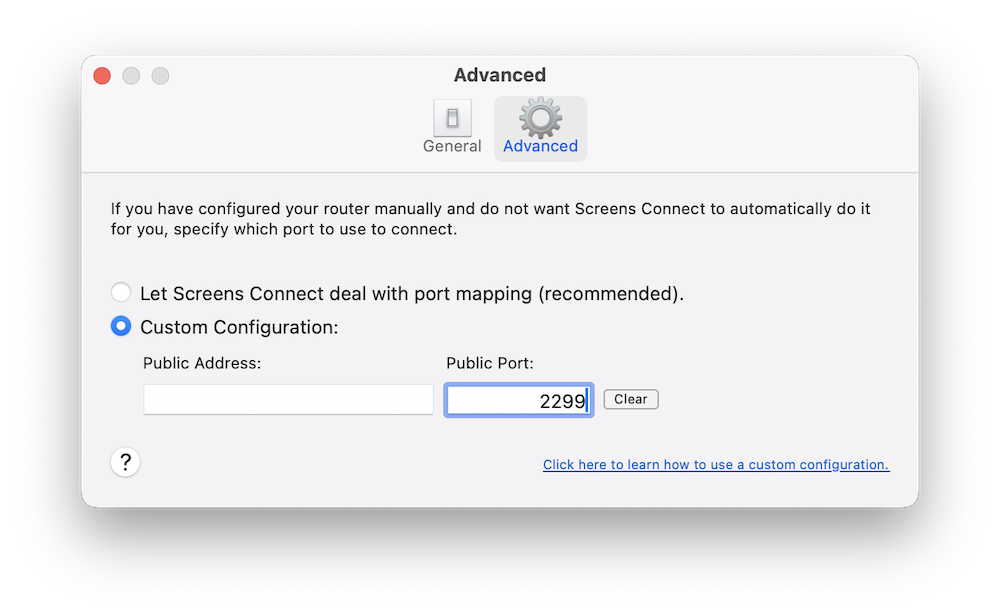
Leave the Public IP Address field empty.
Close the Screens Connect Preferences window. Screens Connect will update the connection information stored with your account.
Multiple Macs Require Different Public Ports
A public port can normally be forwarded to only one computer.
If you're configuring multiple Macs, give each one a different public port, even though they can all forward internally to port 5900.
For example:
Julia's Mac
Public port 59107 → 192.168.1.20:5900

John's Mac
Public port 59108 → 192.168.1.21:5900
Configure each Mac's Screens Connect installation with its corresponding public port.
Test Your Configuration
Port forwarding should be tested from outside the remote Mac's local network.
The easiest test is usually:
- Disable Wi-Fi on your iPhone or iPad.
- Make sure you're using cellular data.
- Open Screens.
- Select your Mac from the Screens Connect section.
- Try connecting to the Mac.
You can also test from another Wi-Fi network.
If Screens connects successfully, your manual configuration is working.
If It Still Doesn't Work
If the port forwarding rule appears correct but Screens still cannot connect, something else may be preventing incoming connections.
Check for:
- Router firewall or security features.
- macOS firewall or security software.
- VPN or network filtering software.
- Double NAT.
- Carrier-Grade NAT (CGNAT).
- Restrictions imposed by your Internet provider.
Some Internet providers also provide security features that can block incoming traffic even when a port forwarding rule exists.
For example, Xfinity Advanced Security may block traffic to forwarded ports. Refer to Xfinity's documentation if your forwarding rule appears correct but incoming connections are still blocked.
You can find additional troubleshooting information here:
Screens Connect Troubleshooting
If you don't want to troubleshoot incoming port forwarding, Screens' native Tailscale support is generally the easiest alternative:
Make Sure Your Mac Can Wake
A correctly configured router won't help if the Mac isn't available when you try to connect.
Make sure the Mac is configured to wake for incoming connections: